How to Install a Retaining Wall: A Step-by-Step Guide
Installing a retaining wall is one of the best ways to protect your yard, control soil movement, and improve how your outdoor space looks. This guide explains the full process in clear, simple steps so anyone can understand it. You will learn what to plan, what to build, and how to avoid common mistakes. By the end, you will know exactly how a strong retaining wall is installed from start to finish.
Why Retaining Walls Are So Useful
A retaining wall holds soil in place and stops it from sliding during rain. It also helps manage water and creates flat areas for gardens or paths. Without a wall, slopes slowly wash away over time. With a wall, your land stays firm and safe.
Start With a Clear Plan
Every good project begins with planning. Decide where the wall will go and what problem it solves. Is it holding back a slope or shaping a garden? When the goal is clear, every step becomes easier and more focused.
Check the Area Carefully
Look at the soil, slope, and water flow in the area. Some soil drains well, while others hold water. Knowing this early helps you plan the right base and drainage, which keeps the wall strong.
Know When Professional Help Matters
Small walls can be handled by homeowners, but larger projects need more skill. Many people consult experts for retaining wall installation when height, drainage, or safety becomes complex. This step can prevent costly mistakes.
Choose the Right Materials
Retaining walls can be built with concrete blocks, stone, wood, or poured concrete. Concrete blocks are popular because they are strong and easy to stack. The stone looks natural and lasts a long time. Wood is simple but may not last as long.
Measure and Mark the Wall Line
Use stakes and string to mark where the wall will go. This shows the shape clearly and helps keep the wall straight. A clean layout now saves time and fixes later.
Dig a Strong Trench
The trench is the foundation of the wall. Dig deep enough so the first row of blocks sits partly below ground. This hidden depth adds strength and helps stop movement over time.
Build a Solid Gravel Base
Fill the trench with crushed stone or gravel. Spread it evenly and press it down firmly. This base supports the wall and allows water to drain away. A strong base is one of the most important steps.
Level the Base With Care
Use a level tool to check the gravel base. Adjust until it is flat from end to end. Even small slopes can cause big problems later. A level base keeps the wall straight and stable.
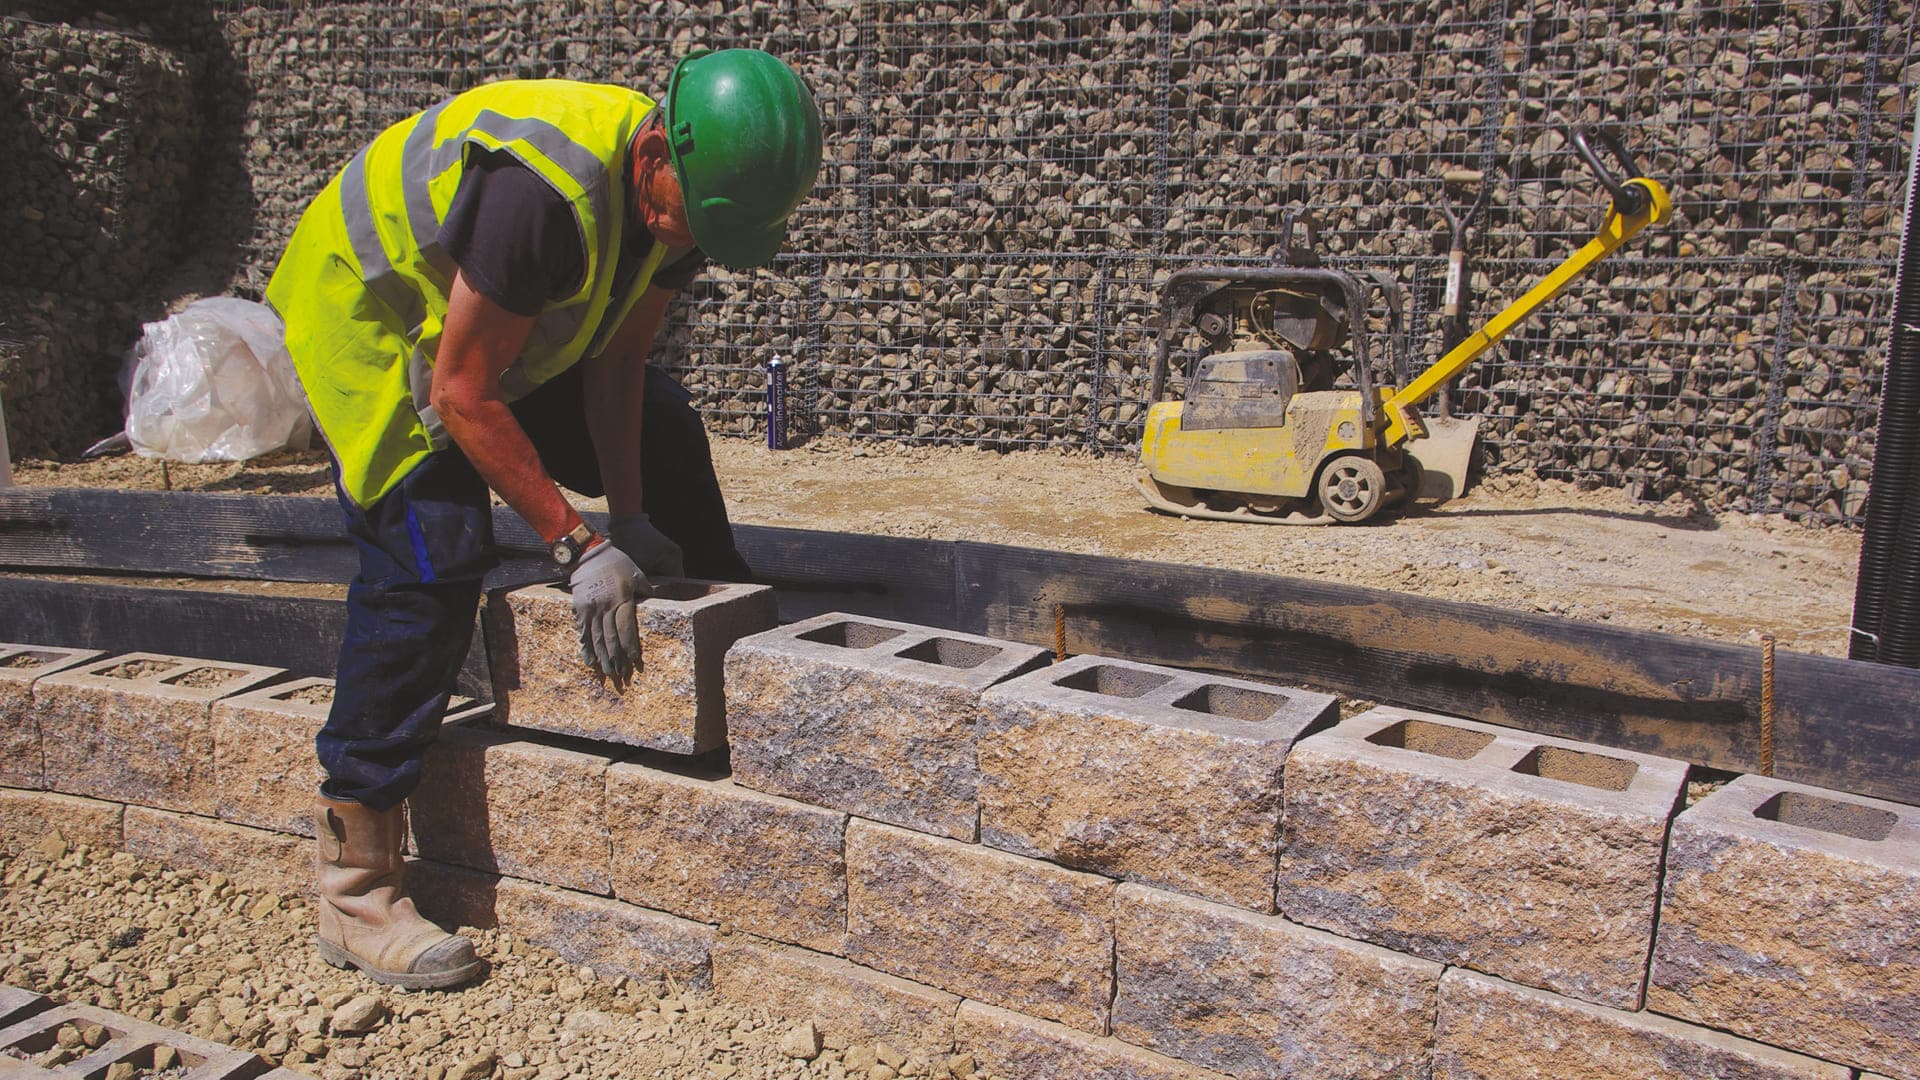
Set the First Row Perfectly
Place the first row of blocks on the gravel base. Check each block for level and alignment. This row supports the entire wall, so take your time. A perfect first row makes everything else easier.
Stack Blocks the Right Way
Add blocks one row at a time. Fit them tightly together and follow the block design. Slightly step each row back toward the soil. This backward lean helps the wall resist soil pressure.
Add Drainage as You Build
Water trapped behind a wall causes pressure and damage. Place gravel behind the wall as you stack blocks. A drain pipe at the bottom helps move water away. Good drainage protects the wall long-term.
Backfill in Small Layers
Backfilling means placing soil behind the wall. Do this slowly in thin layers. Press each layer down firmly. This adds support and prevents shifting later.
Cap the Wall for a Clean Finish
Cap stones go on the top row and lock everything together. Use strong adhesive to secure them. Caps protect the wall from weather and give it a polished look.
Focus on Safety While Working
Wear gloves, boots, and eye protection. Lift blocks carefully and take breaks when needed. Working safely helps you stay focused and avoid injuries.
Common Mistakes to Avoid
Skipping the gravel base or drainage is a major mistake. Rushing leveling or stacking blocks unevenly also causes failure later. Careful work at each step prevents these problems.
How Tall Is Safe to Build
Short walls are easier and safer to build. Taller walls hold more soil and water pressure. When walls get higher, design and drainage become more important.
How Long a Retaining Wall Lasts
A well-built retaining wall can last decades. Concrete and stone walls often last 40 years or more. Proper drainage and a strong base make the biggest difference.
Simple Maintenance Tips
Check the wall once or twice a year. Look for cracks, leaning, or blocked drainage. Clean debris from behind the wall. Small checks help prevent big repairs.
Final Thoughts on Building With Confidence
Installing a retaining wall takes patience, planning, and care. Each step supports the next, and none should be rushed. When done right, your wall becomes a strong and helpful part of your yard.
Frequently Asked Questions
Q: Can I install a retaining wall by myself?
A: Yes, small walls are suitable for DIY projects if you follow each step carefully and include proper drainage.
Q: What is the best material for beginners?
A: Concrete blocks are best for beginners because they are strong, easy to stack, and designed for stability.
Q: How deep should the trench be?
A: The trench should be deep enough so the first row of blocks sits partly below ground, usually several inches.
Q: Do retaining walls always need drainage?
A: Yes. Drainage is essential to release water pressure and prevent wall failure over time.
Q: How long does installation usually take?
A: Small walls may take a few days, while larger projects can take longer depending on size and soil conditions.


Easy tips and tricks to clean your sofa at home
The sofa is the center of your living space. Your sofa is a place where you can relax, ent…
Entertainment Online with Positive Play
G28 proudly stands as a leading and reputable digital entertainment platform that represents quality, …


